
First-time installation
Requirements
- Important! - Blackout 5.0 and above supports only Server 2022, 2023, and 2024
- All browsers supported by Relativity Server 2022, 2023, and 2024
- Due to changes in Relativity Server 2025, previous versions of Blackout are not compatible. Customers upgrading to Server 2025 must install the latest Blackout build designed for Server 2025 environments. Please contact support@milyli.com for the latest build
- Must be installed from the Relativity system admin application library
What to expect
What you'll see
- Installation should only take a few minutes
- A new tab named "Blackout" has been added to the Relativity admin section
- A new schema will be added to EDDS called Blackout
- Blackout tables will be created using this schema in EDDS
- Several configurations will be added to the Relativity configuration table under the section Milyli.Blackout
SQL version support
Note: Blackout 4.8 and above, requires SQL Server 2016 with compatibility mode set to at least 130. To check the compatibility mode level of your SQL Server, you can run the following query:
SELECT name, compatibility_level FROM sys.databases WHERE [name] = 'EDDS';
To update the compatibility mode level, please follow these steps:
- Connect to your SQL Server using SQL Server Management Studio.
- Right-click on the EDDS database and select Properties.
- In the Select a page pane, click Options.
- In the Compatibility level drop-down list, select the desired compatibility level.
- Click OK to save the changes.
Alternatively, the compatibility mode can be updated using the following SQL script:
ALTER DATABASE [EDDS] SET COMPATIBILITY_LEVEL = 130;
Installing Blackout
Before you begin
- Ensure that you have received the Blackout RAP file shared with you from Milyli’s secure file sharing platform.
- If you have not received the RAP, please contact support@milyli.com.
- The file will be delivered by Milyli’s instance of Citrix ShareFile.
- Blackout must be installed through the admin level Relativity application library.
- Ensure that you have access before beginning
How to install Blackout
- Navigate to the Application & Scripts | Application Library tab in the Relativity Admin section.
- Click Upload Application.
- Click Choose File.
- Select the Blackout RAP and click the Open button.
- After the file uploads, click the Save button.
- Next to Workspaces installed click the Install button.
- Click the ... button next to Workspaces.
- Check any workspaces where Blackout may need to be installed.
- Click Ok.
- Click the Save button.
Submitting a license request
After successfully installing Blackout, a license request must be generated to retrieve a valid license from Milyli.
- Navigate to the Blackout | Configuration tab in the Relativity admin section.
- Click on Generate License Request.
- Click Copy License Request.
- Submit the license request body to support@milyli.com.
- Milyli will supply a license key in response.
- Click on Apply License.
- Paste the license key in the box.
- Click Apply Blackout License.
Pushing Blackout to a workspace
After applying the license Blackout can be installed into any workspace that you require.
Note: It is required to push Blackout to workspaces via the Application Library.
- Navigate to the Application & Scripts | Application Library tab in the Relativity Admin section.
- Filter for the Blackout Application and select it.
- Next to Workspaces installed click the Install button.
- Click the ... button next to Workspaces.
- Check any workspaces that Blackout needs to be installed on.
- Click Ok.
- Click the Save button.
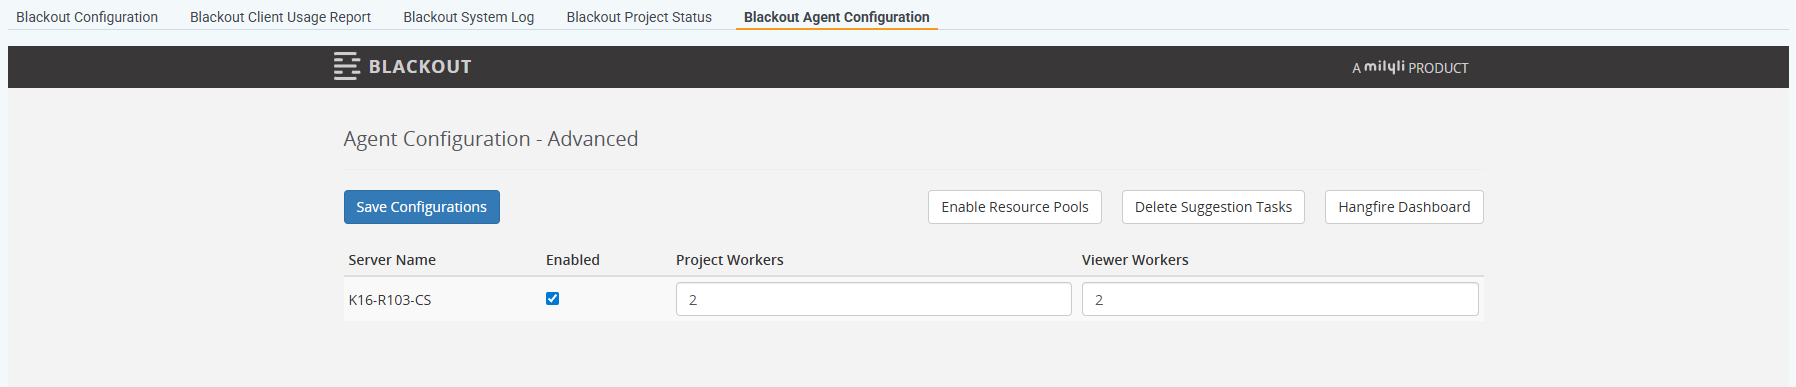
How to Install Blackout Agents
- Navigate to the Blackout tab then choose Agent Configuration.
- Identify the desired agent server and select the Enabled checkbox.
- Specify worker allocation:
- Assign the number of Project Workers and Viewer Workers for that server.
- By default, both work types are enabled.
- Click Save Configurations.
Blackout will automatically deploy the agents with the configured worker counts.
Verifying Agent Installation
The status of the agent can be verified by:
- Go to Server & Agent Management tab then choose Agents.
- Filter the Application column to Blackout.
- The Enabled column should read Yes. The Message column displays active worker counts.