
Manual PDF markups
Blackout adds functionality for manually redacting PDFs in the Relativity viewer. The Relativity viewer is extended with new tools for drawing redactions, removing attachments, and eliminating annotations. The redaction experience has been loosely tailored to be similar to redacting images in Relativity through a familiar toolset and workflow.
Before you begin
- If you are a first-time reviewer or new to redacting documents manually with blackout, make sure that you have been granted permissions to do so. Take a look at the PDF permissions documentation to learn more.
- Marking up PDFs is similar to markup up images. Redactions are not immediately burned into the PDF when drawn on the viewer. To 'burn-in' the markups that have been placed a Production Preparation project is required. The PDF can be sampled using the Download Marked Up Document button on the toolbar at the bottom of the viewer.
- Two buttons, located at the top of the viewer, are introduced for native PDF markups. Locate the Blackout 'B' icon to get started.
The Blackout toolbar
The Blackout B icon represents where the tools for marking up PDFs will be located. Within this toolbar you will see the following options:
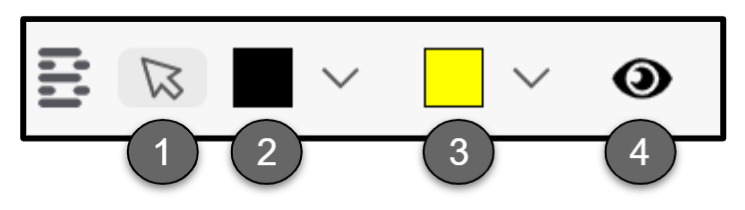
- Selection Mode: allows for selecting, moving, and resizing of markups.
- Redaction Mode: enables redaction and allows the selection of redaction styles.
- Highlight Mode: enables highlight mode and allows the selection of highlight colors.
- Blackout Visibility Toggle: toggles between visibility modes.
- The active selection on the toolbar is indicated by a gray filled outline around the selected mode.
- The active redaction or highlight style is indicated by bold text within the selected mode.
The Blackout visibility toggle
Clicking the visibility toggle will cycle through multiple stages of visibility for reviewing the content underneath markups.
The following icons represent each visibility state.
| Icon | Description |
|---|---|
 | All markups are visible |
 | All markups are transparent |
 | All markups are no longer visible |
Redactions and highlights
What to know
- Users with the proper permissions can use the redaction and highlight toolbar menus to markup documents directly without taking the file out of Relativity.
- Markups are drawn without writing immediately to the PDF to allow for quick review and navigation.
- Blackout, PDF specific, audits are written for placing and deleting (reverting) markups and are available in the Audit sub-tab of the Blackout tab. Audits are not available for moving or resizing markups.
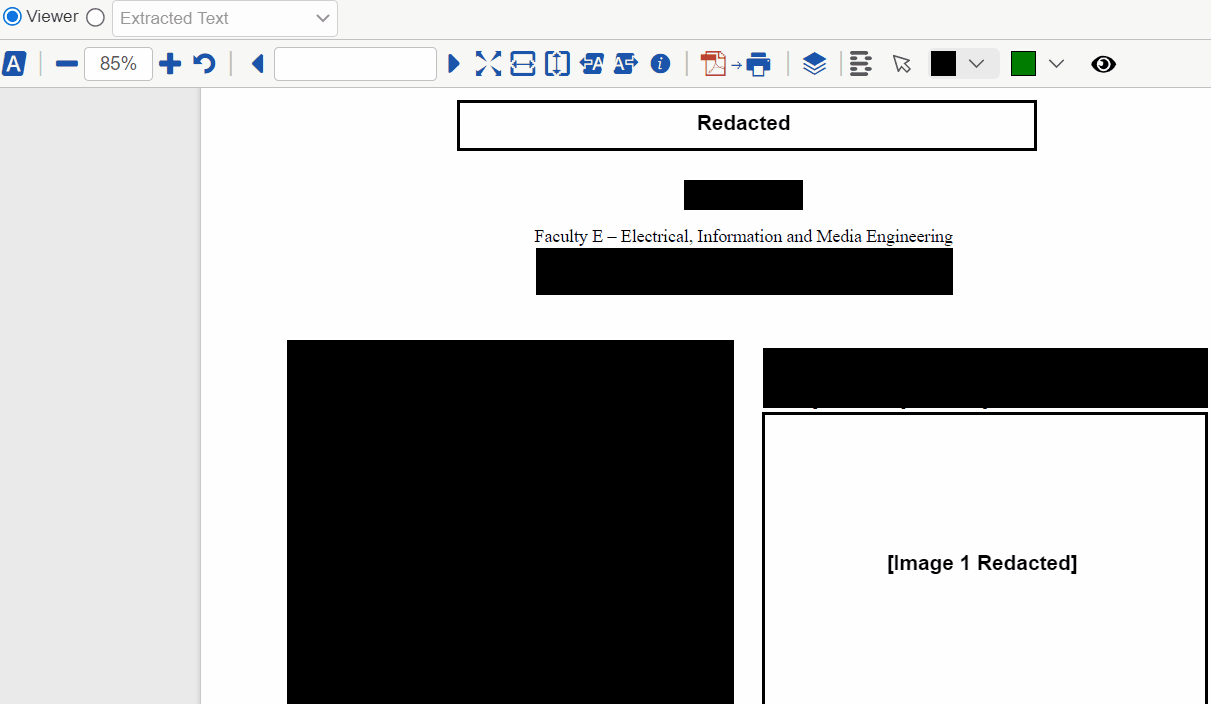
Black and white redactions
- Navigate to the PDF document in the Relativity viewer
- Switch the markup set to the required one for the case
- Click the redaction mode button and select the desired redaction style. A drop down will be displayed showing Black, White, or Text options. Black is selected by default.
- Black: creates a solid black box, like using a black marker.
- White: creates a solid white box with a gray border for tracking. The gray border won't be on the burned-in document.
- Text: creates a white redaction box with horizontally and vertically centered black text.
- Click and drag over the area where the redaction will be placed.

Text redactions
- Navigate to the PDF document in the Relativity viewer
- Switch the markup set to the required one for the case
- Click the redaction mode button and select text.
- Click and drag over the area where the text redaction will be placed.
Redaction text
The default text of the text redaction is based on the value of the markup set. Text redactions on PDFs behave exactly as they do on Relativity images.
Case admins can modify the default value by following the steps below.
- Navigate to the Case Admin tab.
- Select Markup Sets.
- Click the Edit button to edit the markup set information.
- Change the Redaction Text field to the desired default text.
- Click Save.
Text redactions can also be changed directly on the document on a redaction-by-redaction basis. After changing the text, subsequent text redactions will automatically use the newly input value. The default value will remain available in the right-click menu to go back to at any time.
- Navigate to and select the text redaction that will be changed.
- Right-click the redaction that will be edited.
- A menu will be displayed. Select Edit.
- A new menu will be displayed. Enter the desired text for the markup.
- Click Save.
- The text will be modified to match the input text.
Highlights
- Navigate to the PDF document in the Relativity viewer
- Switch the Native Markup Set to the required one for the case
- Click the highlight mode button and choose the desired highlight color.
- Click and drag over the area where the highlight will be placed.
Manually removing markups
How to do it
Removing markups can be accomplished through two quickly accessible means. Depending on the source of the markup these options will have slightly different behaviors. If the markup was placed manually, both of the operations below will completely remove the markup. If the markup was placed with an automated project, the delete operation below will be the same as rejecting the markup from the quality control interface.
1. Right-clicking
- On the document, find the markup that will be removed.
- Left-click to select the markup.
- Right-click the markup.
- Select the Delete Markup button.
- A message will appear to confirm the deletion. Select, Delete Markup to confirm.
- After a brief delay, the markup will be removed.
2. The delete key shortcut
- On the document, find the markup that will be removed.
- Click on the markup to select it.
- Press the delete key on your keyboard.
- A message will appear to confirm the deletion. Select, Delete Markup to confirm.
- After a brief delay, the markup will be removed.