
Agent configuration & set-up
Basic configuration
Definitions
| Resource | Definition |
|---|---|
| Blackout Agent | A single Relativity agent that handles all Blackout-related work. Manages tasks such as OCR, redactions, and document processing. |
| Project Worker | Prioritizes project-related tasks. Project workers process queued projects based on priority and will pick up viewer tasks when no project work is available. |
| Viewer Worker | Prioritizes viewer-related actions, such as Find & Redact, Excel burn-in, and OCR Ahead. Viewer workers can assist with project tasks when idle. |
| Worker Counts | The number of concurrent tasks that can be processed per server. Admins can configure how many workers are assigned to Project and Viewer tasks. |
What to Know About Agent Installation
- Blackout agents are installed via the Blackout Agent Configuration tab instead of the Relativity Agent tab.
- The Blackout Agent Configuration tab provides a list of all of the agent servers that are registered to your instance and whether they are enabled for use with Blackout
- Blackout Agents must not be on the same servers that are used for the following: Conversion, Conversion Complete, or dtSearch Agents.
Common Configurations
For all configurations, it is recommended to follow a 1 to 2 ratio for cpu to ram when setting up agent servers. ie: 4 cpu cores to 8 GB of Ram.
How to Install Blackout Agents
- Navigate to the Blackout tab then choose Agent Configuration.
- Identify the desired agent server and select the Enabled checkbox.
- Specify worker allocation:
- Assign the number of Project Workers and Viewer Workers for that server.
- By default, both work types are enabled.
- Click Save Configurations.
Blackout will automatically deploy the agents with the configured worker counts.
Verifying Agent Installation
The status of the agent can be verified by:
- Go to Server & Agent Management tab then choose Agents.
- Filter the Application column to Blackout.
- The Enabled column should read Yes. The Message column displays active worker counts.
Other Considerations
- The amount of work Blackout can handle is tied to your configuration and set-up. There are many things that can change how fast Blackout runs such as the size of Excel documents or the resolution of images.
Adding a Blackout Server to a Resource Pool
What to Know
Resource pool aware agents allow system administrators to create dedicated agents for individual clients and workspaces, isolating their Blackout capacity from the rest of the system.
When resource pool awareness is enabled:
- Agents only pick up work for their assigned resource pool.
When resource pool awareness is disabled:
- All agents can process all Blackout work across the instance.
How to Enable Resource Pools
- Navigate to Blackout → Agent Configuration.
- Click Enable Resource Pools.
- A new column will display each agent server’s assigned pool.
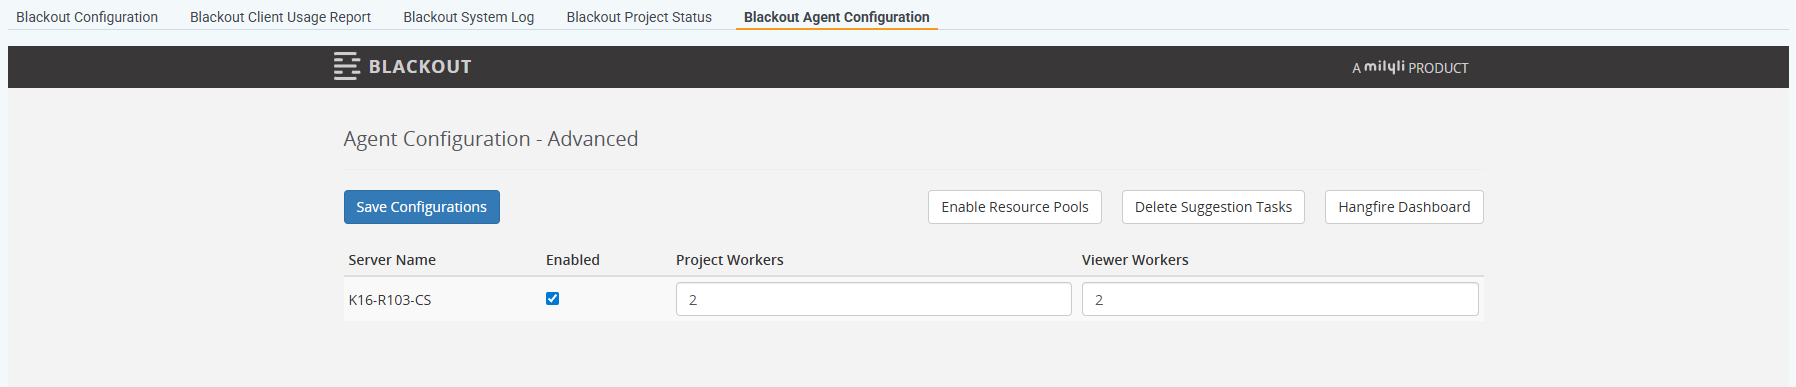
Advanced Configuration
The Blackout Agent Configuration tab also has an advanced mode. This will allow for a more specific configuration of the default and workers on each agent server.
Note: Before enabling this setting, reach out to us at support@milyli.com.
What to Know
- It is generally safe to increase the number of workers to a 1:1 ratio with the number of CPUs as long as there is not a lot of load on the agent server from other agents
- Increasing beyond this will not necessarily equate to increased throughput
- It is important to use your test instances to identify configurations that work for your hardware and Relativity instance as throughput varies greatly from instance to instance and infrastructure to infrastructure
How to Enable Advanced Mode
- Navigate to Blackout Configuration Tab.
- Check the Enable Advanced Agent Configuration Options checkbox.
- A confirmation prompt will be displayed, asking if you are sure you wish to enable advanced mode.
- Click ‘Ok’ on the confirmation prompt.
- Click the ‘Save’ button.
The Agent Configuration tab will now include editable Project Workers and Viewer Workers columns.
Updating Worker Counts
- Adjust worker values as needed and click Save Configurations.
- You must maintain at least one active Project and one active Viewer worker overall.
After clicking save, behind the scenes:
- The agents internal server will be stopped
- The configuration for each agent will be updated
- The agents will be restarted
- The project engine will work to pick up where it left off.